

- All
- Product Name
- Product Keyword
- Product Model
- Product Summary
- Product Description
- Multi Field Search
Views: 0 Author: Site Editor Publish Time: 2026-09-17 Origin: Site
Choosing the correct replacement track shoe requires more than checking its appearance or width. Two excavator track shoes may look almost identical but still have different bolt patterns, mounting dimensions, track pitch, or grouser geometry.
For distributors, repair companies, equipment owners, and B2B buyers, accurate measurement is an important step in confirming the correct replacement part.
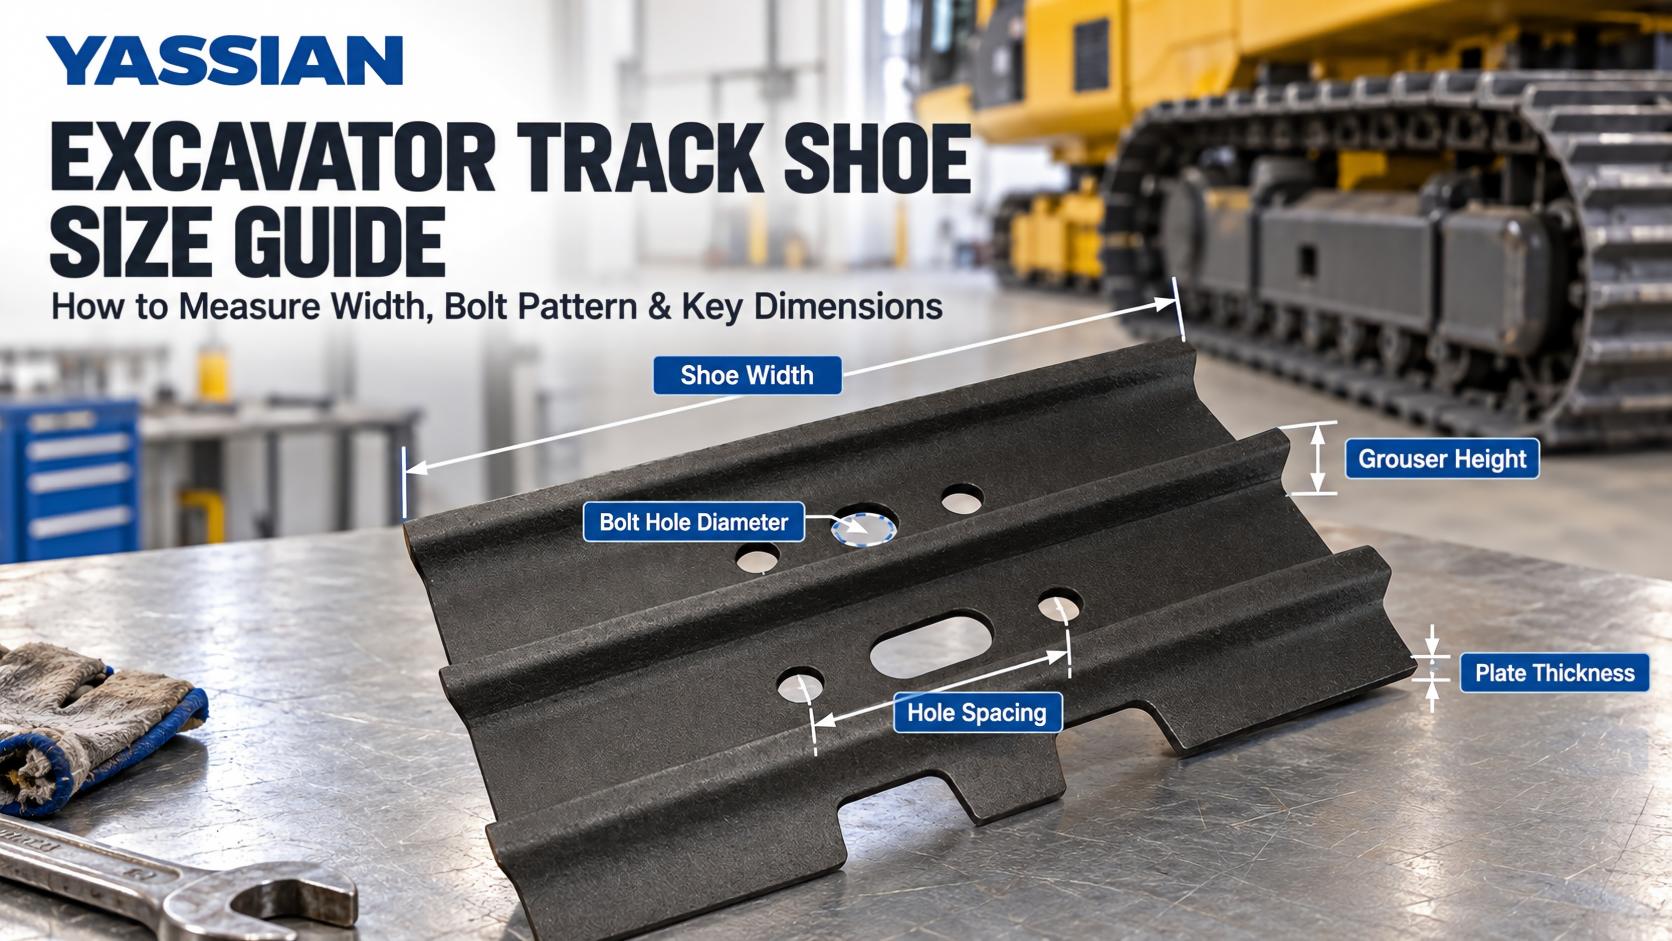
This excavator track shoe size guide explains how to measure track shoes, including shoe width, grouser height, plate thickness, bolt hole diameter, hole spacing, bolt pattern, and track pitch.

Track shoes are bolted to the track links and form the main ground-contact surface of the undercarriage.
Incorrect dimensions may cause:
· Bolt holes that do not align
· Poor fit with the track link
· Installation difficulties
· Incorrect shoe width for the application
· Additional undercarriage stress
This is why visual similarity should never be used as the only compatibility check.
Similar appearance does not guarantee correct fitment.
A reliable identification process should combine the machine model, part number, track chain information, and key track shoe dimensions.
Before taking measurements, collect as much identification information as possible:
· Machine manufacturer
· Excavator model
· Serial number, if available
· Existing part number
· Track chain type
· Grouser type
· Track pitch
· Existing track shoe photos
If the original part number is still visible, use it together with the machine model as the first reference. Measurements should then be used to verify compatibility.

Excavator track shoe width usually refers to the total distance from one outer edge of the shoe plate to the opposite outer edge.
To measure it:
1. Place the track shoe on a flat surface.
2. Measure from one outer edge to the opposite edge.
3. Keep the measuring tool square to the shoe.
4. Avoid bent or severely worn areas.
A common mistake is measuring only the grouser instead of the complete shoe plate.
Track shoe width and grouser width are not the same measurement.
If the shoe is damaged, compare several points before recording the final width.
The grouser is the raised section of the shoe that contacts the ground and provides traction.
Grouser height is generally measured from the shoe plate reference surface to the top of the grouser.
This measurement can help with:
· Shoe profile identification
· Wear inspection
· New vs worn comparison
· Grouser type confirmation
However, a worn grouser may be much shorter than its original specification.
Do not treat a worn grouser height as an original dimension without verification.

Plate thickness is another useful identification dimension.
When measuring:
· Choose a relatively unworn section
· Avoid damaged or deformed areas
· Use a caliper where practical
· Do not rely on heavily worn edges
Plate thickness can help distinguish visually similar track shoes intended for different applications or machine configurations.
Bolt holes connect the track shoe to the track link, making their dimensions important for track shoe compatibility.
Measure the internal diameter of the bolt hole using a suitable tool.
Before measuring, inspect for:
· Enlarged holes
· Oval-shaped holes
· Edge wear
· Damage around the bolt seat
A worn bolt hole may no longer represent the original diameter, so measuring several holes is recommended.

The track shoe bolt pattern includes more than just hole diameter. The spacing between holes is equally important.
Use:
Center-to-center distance
Measure from the center of one bolt hole to the center of the corresponding hole.
Depending on the design, you may need to record:
· Longitudinal spacing
· Lateral spacing
· Distance between bolt-hole rows
Avoid measuring only from one hole edge to another, because wear may affect the result.
A complete bolt pattern includes:
· Number of bolt holes
· Hole diameter
· Hole spacing
· Hole arrangement
· Mounting layout
Two track shoes may have the same width and a similar grouser shape but still use different mounting patterns.
That means:
Same width does not mean same compatibility.
For B2B buyers, clear top-view photos showing all bolt holes can also help with identification.
Track pitch is not a track shoe width measurement, but it is important when confirming compatibility with the track chain.
Track pitch generally refers to the center-to-center distance between adjacent track pins.
A basic measurement is:
Pin Center → Adjacent Pin Center
For better accuracy on a used chain, measure several pitches together:
Total Distance ÷ Number of Pitches = Average Pitch
Using several pitches can reduce the effect of individual joint wear and measurement error.
Track pitch should always be considered together with the bolt pattern and track link configuration.
Many replacement inquiries involve old or worn parts rather than new samples.
A worn track shoe may have:
· Reduced grouser height
· Worn shoe edges
· Enlarged bolt holes
· Local plate thinning
· Bent shoe plates
· Damaged mounting surfaces
For this reason, do not rely on one worn measurement alone.
A more reliable identification process combines:
Part Number + Machine Model + Multiple Dimensions + Track Chain Information + Photos
This is especially important when the original markings are difficult to read.
Measurement | New Track Shoe | Possible Issue on Worn Shoe |
Shoe Width | Clear reference | Edges may be worn or bent |
Grouser Height | Original profile | Reduced by abrasion |
Plate Thickness | Original section | Local wear may reduce thickness |
Bolt Hole Diameter | Original geometry | Holes may enlarge |
Hole Spacing | Stable reference | Deformation may affect measurement |
Used-part measurements should always be interpreted carefully.
Several mistakes can lead to incorrect replacement selection.
Width alone cannot confirm compatibility.
The correct width is not enough if the bolt holes do not match the track link.
Center-to-center spacing provides a more useful reference.
Track shoe selection should also consider the track chain configuration.
Damage or deformation can change apparent dimensions.
If the original part number is available, it should remain an important identification reference.
Accurate measurements are essential, but track shoe dimensions are only one part of compatibility confirmation.
Before ordering, also check:
· Part number
· Machine model
· Track pitch
· Track chain type
· Bolt pattern
· Grouser type
· Mounting surface
· Working application
Two shoes with similar physical dimensions may still have different technical applications.
Physical similarity does not guarantee technical compatibility.
Before sending a replacement track shoe inquiry, prepare:
· Manufacturer
· Machine model
· Serial number, if available
· Existing part number
· Grouser type
· Existing shoe type
· Overall shoe width
· Grouser height
· Plate thickness
· Bolt hole diameter
· Hole spacing
· Track pitch
· Required quantity
· Working conditions
· Existing part photos
· Destination market
Providing complete information makes compatibility confirmation more efficient and helps reduce ordering errors.
Learning how to measure track shoes correctly is an important step when identifying replacement parts.
The most useful dimensions include:
Track Shoe Width + Grouser Height + Plate Thickness + Bolt Hole Diameter + Hole Spacing + Bolt Pattern + Track Pitch
However, measurements should always be used together with the part number, machine model, track chain information, and clear photos.
For distributors, importers, repair companies, and equipment owners, this combination provides a much stronger basis for confirming excavator track shoe compatibility than appearance or width alone.

